











If you have ever had to open every ad, post, slide, and promotion just to update one tiny brand element, Canva Components are about to make your life so much easier.
A Canva Component lets you save a single design element or a group of elements as a reusable, connected asset. Think logos, text blocks, mock-ups, highlight circles, social media graphics, or recurring promotional elements. You can update the original source once, publish the change, and then apply it wherever that component appears.
It is a genuinely brilliant way to protect your brand consistency while saving heaps of time in Canva.
Table of Contents
- Step 1: Choose the brand elements you reuse most
- Step 2: Create your first Canva Component
- Step 3: Organise components into Brand Kit categories
- Step 4: Insert your component into other designs
- Step 5: Edit the source and publish your changes
- Step 6: Apply the update to one or all instances
- Step 7: Control how text and editable details behave
- Step 8: Build a component library that makes design faster
- Step 9: Use components to make your brand look polished everywhere
Step 1: Choose the brand elements you reuse most
Start by looking for the little pieces of your designs that appear again and again. Canva Components can be created from a single item or a group of items, including text, graphics, photos, and elements inside frames.
For example, imagine you use a laptop mock-up in your ads to preview a masterclass. The laptop may contain a screen graphic, a particular colour, and a little collection of brand details. Normally, if you later wanted to update the screen, change the laptop colour, or add a new decorative element, you would need to manually change every ad.
With a component, you create that laptop mock-up once, use it throughout your designs, and keep a connected source version ready to update.
Some fabulous component ideas include:
- Your logo lock-up or alternate logo versions
- A recurring laptop, phone, or product mock-up
- Branded decorative graphics, such as highlight circles or scribbles
- Newsletter headings or recurring promotional text blocks
- Offer-specific graphics for a masterclass, launch, or program
- Grouped graphic elements you regularly add to social posts
Canva Components are a Canva Pro feature. If you would like to try the feature, you can access a Canva Pro free trial.
Step 2: Create your first Canva Component
Once you have selected the element or group of elements you want to reuse, right-click it. You can also click the three-dot menu in Canva.
Choose Create component. Canva will open a setup window where you can name the component and decide where it should live.
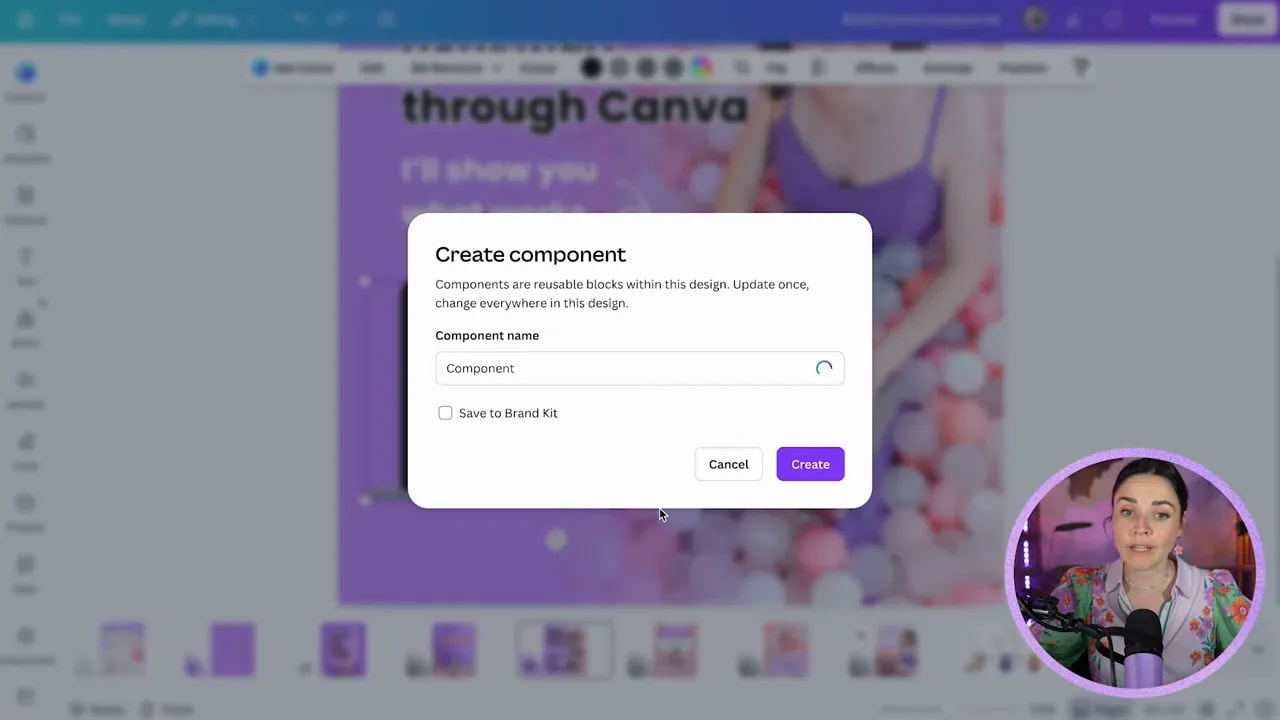
Name your component clearly. Canva may suggest a name using AI, but it is worth choosing a name that makes instant sense to you later. The more components you create, the more important this becomes.
A clear name could be:
- Masterclass laptop mock-up
- Pink highlight circle
- Newsletter header
- Course launch logo lock-up
You have two places to save a component:
- Inside the current document: Use this when you need to update a repeated element across multiple pages in one Canva design.
- Inside your Brand Kit: Use this when you want to access the element across multiple Canva designs.
If you are creating a brand asset you will use repeatedly, saving it to your Brand Kit is usually the really useful option.
Step 3: Organise components into Brand Kit categories
When you choose to save a component to your Brand Kit, Canva lets you choose a brand and a category. The default categories include logos, photos, graphics, and icons.
If you have multiple brands in Canva, make sure you choose the correct one from the brand dropdown before saving.
You can also create your own asset categories, which is very handy when you have a collection of components for a particular offer, program, or campaign.
To create a category, go to your Canva home screen, open Brand Kit, click the plus button, and select Add an asset category.
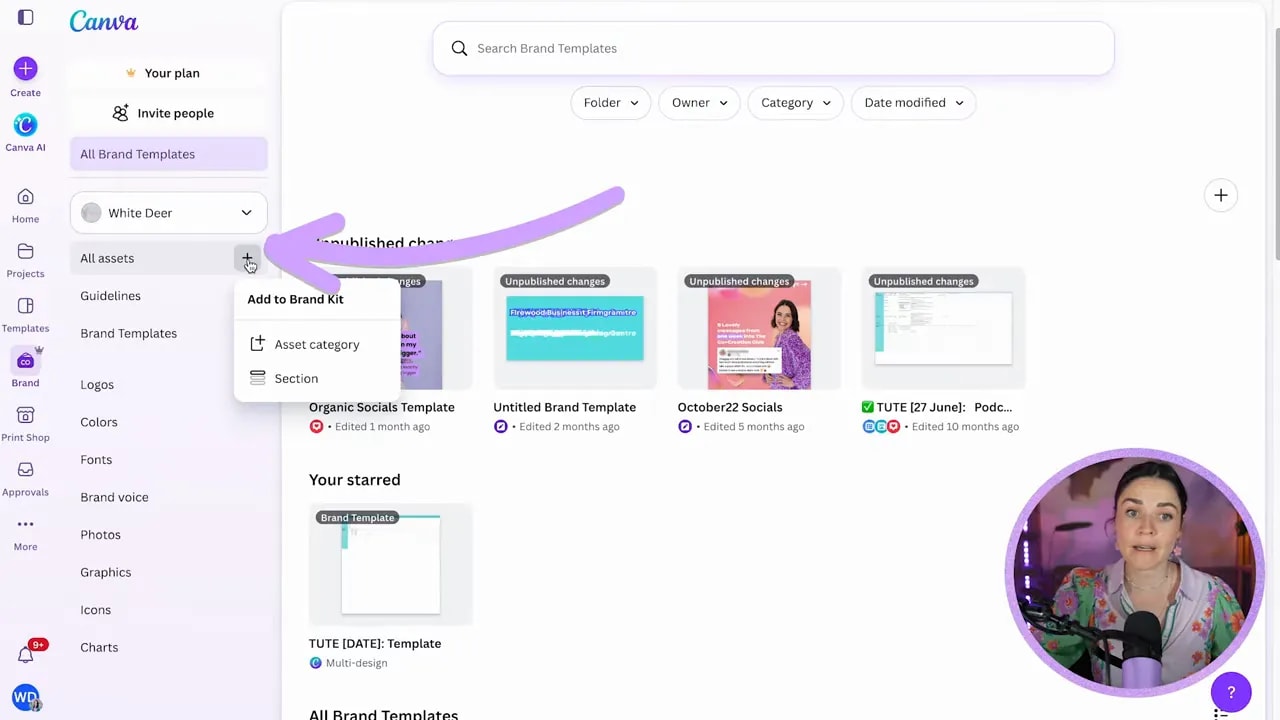
You could keep things broad with a category called Components, or you could be more specific with folders such as:
- Masterclass assets
- Podcast graphics
- Launch components
- Evergreen offer graphics
- Social media callouts
This tiny bit of organisation will save you so much scrolling and searching later. Once your new category is created, refresh your design if needed, then create your component again and select that new category from the Brand Kit options.
Step 4: Insert your component into other designs
After you create a Brand Kit component, you can find it in your Brand Kit and insert it into other Canva designs. You can click it to add it to the page or drag it into place.
At this stage, it behaves much like a normal Canva element. You can resize it and position it in your layout. The difference is that it remains connected to its source.
When you select it, you will see component details such as its name and source. If you open the three-dot menu and hover over Component, you will have two important choices:
- Go to source: Opens the original component so you can make a universal update.
- Detach: Turns that one version back into a standard Canva element with no connection to the component source.
Detach is useful when one placement needs to become a completely separate variation. Otherwise, keep the element connected so you can benefit from future updates.
Step 5: Edit the source and publish your changes
This is where Canva Components become very satisfying.
FREE Design Tools to $100k Masterclass
Grow your biz with clever design and Canva hacks that will save you hours and make you sales.
Select a component, open its component menu, and choose Go to source. Canva opens the source in a whiteboard-style editing space. Here, you can change the component however you like.
For example, you could change a laptop mock-up from black to light purple, update the screen content, or add a playful sparkle graphic to the side.
Once you have made your edits, they are not sent out everywhere immediately. You need to click Publish updates, found in the top-right area where the Share button would normally sit.
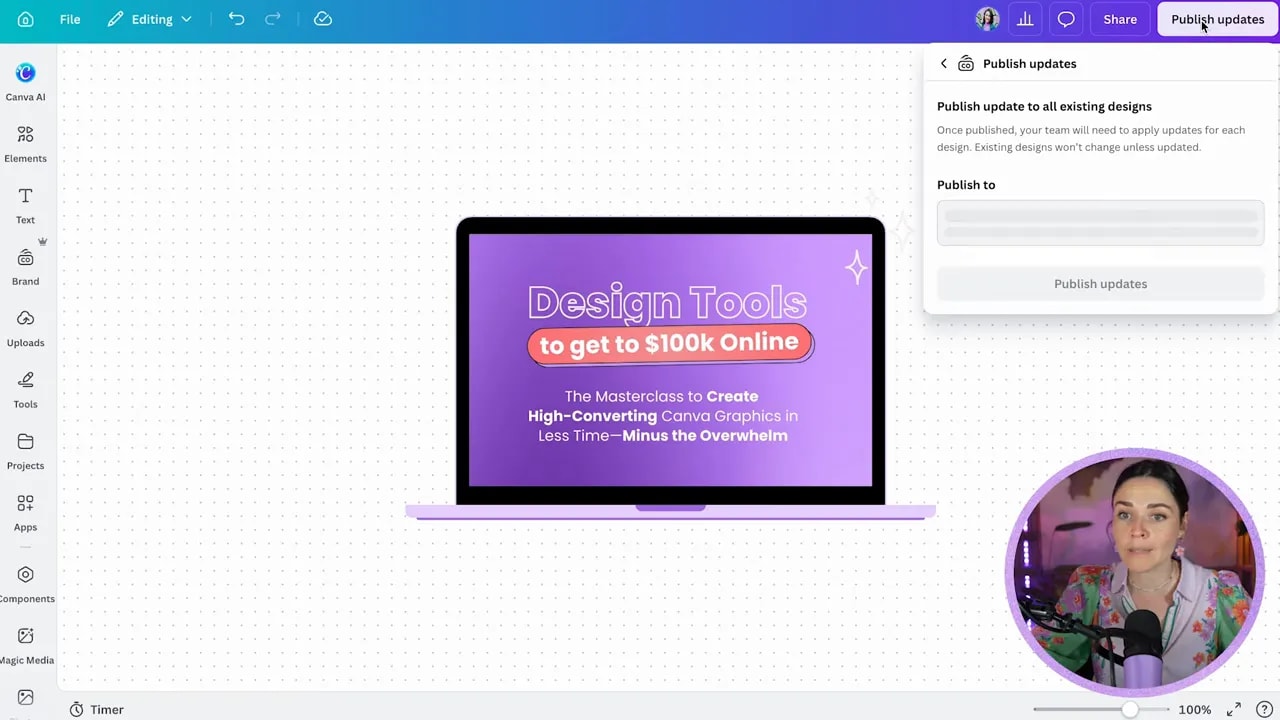
It is important to understand one current limitation: publishing does not automatically update every component instance for you. You still need to return to the designs that use the component and apply the available update.
That said, it is still dramatically quicker than rebuilding or manually editing the original element across every single page.
Step 6: Apply the update to one or all instances
After you publish updates, return to a design where you used the component. Select the component and you should see an Update option.
You can then choose between:
- Update this instance: Apply the source changes to just that component placement.
- Update all instances: Apply the update to every instance of that component within the current design.
This is especially useful if your Canva document contains multiple pages, posts, or ad variations that all use the same component.
Do keep an eye on the result after you update. If you add a new sparkle, text line, or other element to the source, it may affect spacing or placement slightly in certain layouts. The source update gives you the big time-saving change, then you can make any little placement tweaks where needed.
Step 7: Control how text and editable details behave
Components become even more flexible when you include text.
If you add text to a component, make sure all the relevant pieces are grouped together. You can click and drag to select the elements, then use Control + G to group them.
When text is part of your component, selecting the component source gives you extra controls. You can decide what should be updated and what people can change at the individual-instance level.
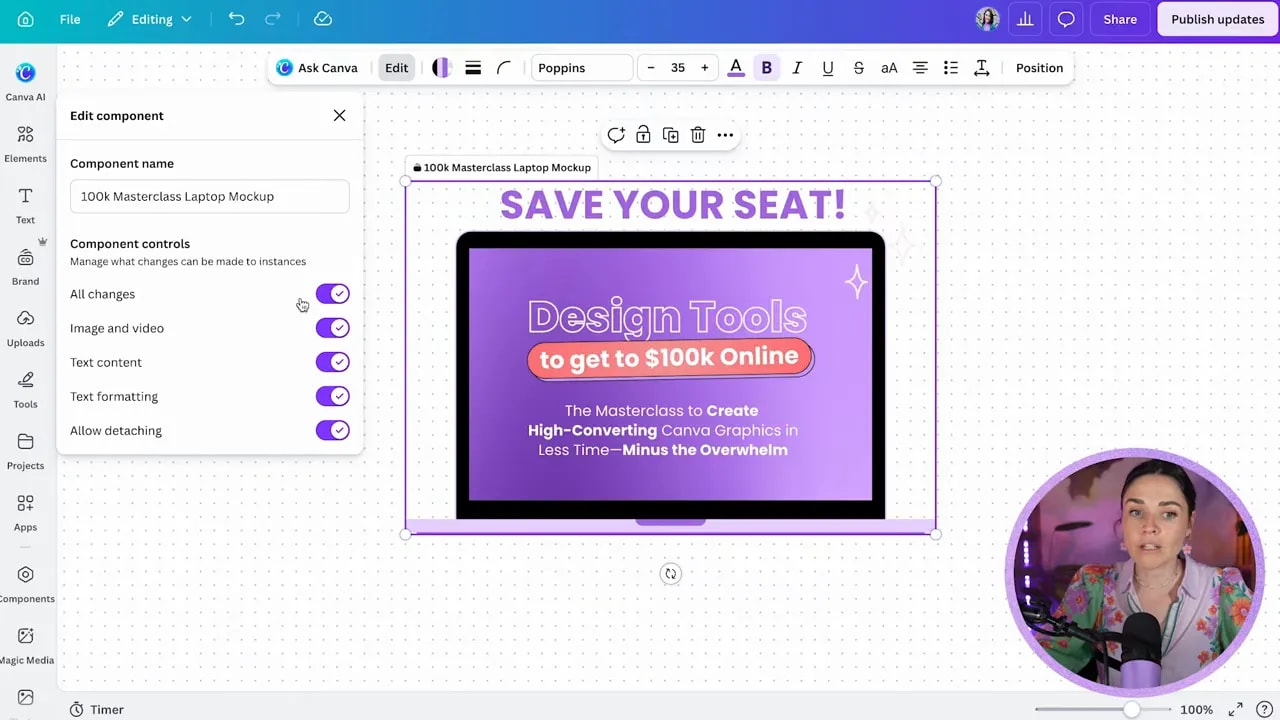
Depending on your component, Canva gives you settings to control:
- Whether images and video update
- Whether text content updates
- Whether text formatting updates
- Whether people can detach the component
This gives you a lovely balance between consistency and flexibility. For example, you may want the same laptop graphic in every design but allow the call to action above it to change from “Save your seat” to a different message in one specific post.
To edit text on an individual component instance, double-click the text as you normally would. You can change the wording, colour, size, font, or remove it completely. Because you are editing that instance rather than the source, those individual tweaks do not automatically alter every other component.
Step 8: Build a component library that makes design faster
The possibilities here are honestly endless. The best approach is to start small and build your component library around the assets that create the most repetitive design work.
For brand consistency, save your key visual ingredients. If you have a particular way you use circles, overlays, labels, or other decorative details, turn them into components. Instead of trying to find the original Canva element every time, you can grab your ready-made branded version from your Brand Kit.
For recurring content, consider text components. If you use a specific text block in newsletters, graphics, or regular promotions, you can update the source text when it changes and refresh the relevant instances rather than copying and pasting content across multiple designs.
The goal is not to make every tiny thing a component. The goal is to identify the things you reuse often enough that updating them manually becomes annoying.
Step 9: Use components to make your brand look polished everywhere
When you manage your own business graphics, consistency can be the difference between designs that look a little thrown together and designs that look beautifully professional.
Canva Components give you a practical way to keep your logos, colours, promotional graphics, and recurring elements aligned across your designs without rebuilding them from scratch each time.
Start with one reusable asset this week. Create it, save it clearly in your Brand Kit, use it in a few designs, and test the update process. Once you get your head around the source, publishing, and refresh steps, you will spot so many other opportunities to save time.
If you would like more help creating polished graphics and applying your visual brand in Canva, you can join the free Design Tools to $100K masterclass. You will learn how to avoid design mistakes that make your graphics look unprofessional, apply your brand to templates, use Canva shortcuts, and create business graphics that help you stand out.