












Talking head reels, also lovingly known as yapping reels, are having a moment for very good reason. You simply talk to camera, share an opinion, piece of knowledge or advice, and turn it into a useful short-form video for Instagram Reels or similar platforms.
They are approachable to make, they help people connect with you, and you do not need a full production team or another editing subscription to create them. If you already have Canva, you can use it to trim your footage, create captions, add a strong visual hook, and even make fancy layered effects.
Table of Contents
- Step 1: Record a simple talking head video
- Step 2: Create the right Instagram Reel file in Canva
- Step 3: Upload your footage and get comfortable with the timeline
- Step 4: Trim the dead space and mistakes
- Step 5: Generate captions so your reel works without sound
- Step 6: Position and style captions for readability
- Step 7: Add a clear visual hook at the start
- Step 8: Use simple images and elements to reinforce your point
- Step 9: Create a layered effect for extra production value
- Step 10: Name, preview, download and post your finished Reel
- Step 11: Post before it feels perfect
Step 1: Record a simple talking head video
Start by recording vertically on your phone. Keep it simple. Good light and clear audio will make the biggest difference to how polished the final reel feels.
Face a window or use a basic studio light setup so your face is bright and easy to see. If you have a microphone, use it. A small wireless mic can make your audio sound much cleaner, but do not let a lack of equipment stop you from recording. It is far better to make the reel now and upgrade your setup later if you want to.
When you frame yourself, leave a little breathing room above or below your head. You will need that space later for captions and a visual hook. Sitting slightly further back is often a very helpful choice for this reason.
Step 2: Create the right Instagram Reel file in Canva
Move your phone footage to your computer in whichever way works best for you. You might AirDrop it, email it to yourself, use Google Drive or Dropbox, or upload it through the Canva mobile app so it appears in your Canva uploads on desktop.
On the Canva homepage, select Create a design and search for Instagram Reel. Choose the basic video format, not a Reel cover.
The correct dimensions are 1080 by 1920 pixels. This is the vertical format you need for a Reel, and selecting a video design gives you the timeline tools required for editing.
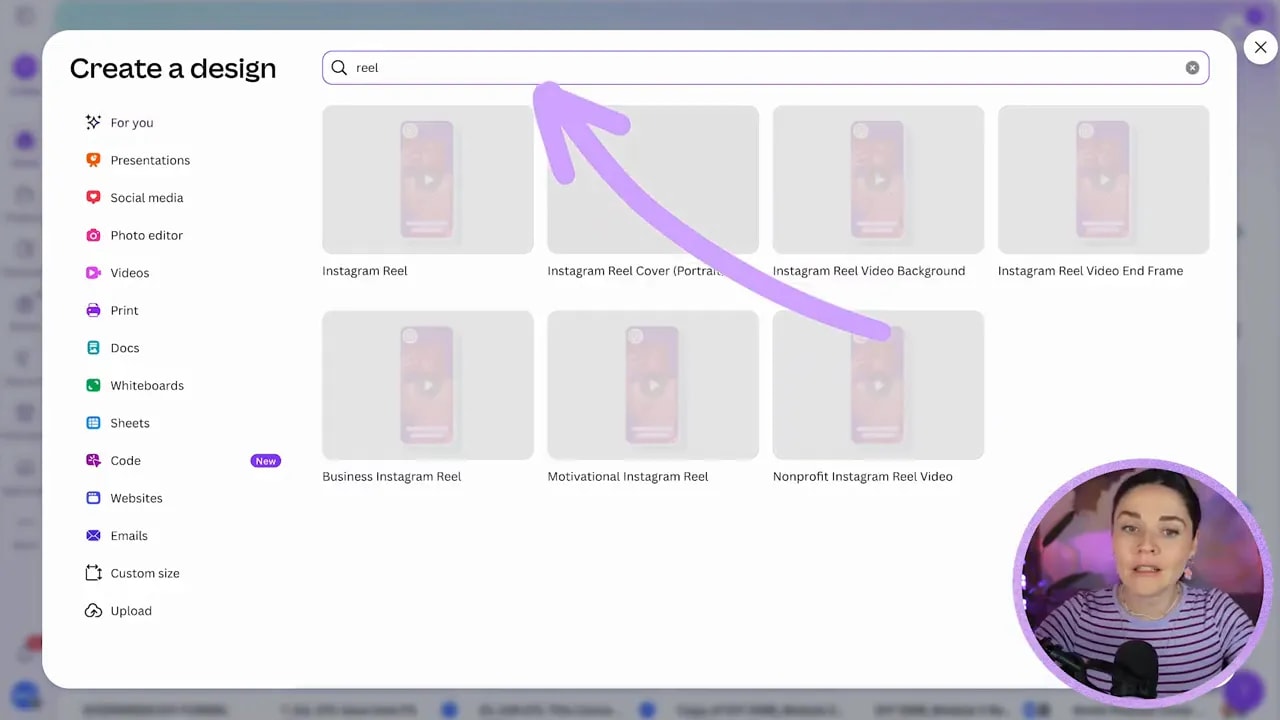
Canva will show plenty of templates, which can be brilliant for other video styles. For a talking head reel, though, you can keep things refreshingly simple. The message is the hero here.
Step 3: Upload your footage and get comfortable with the timeline
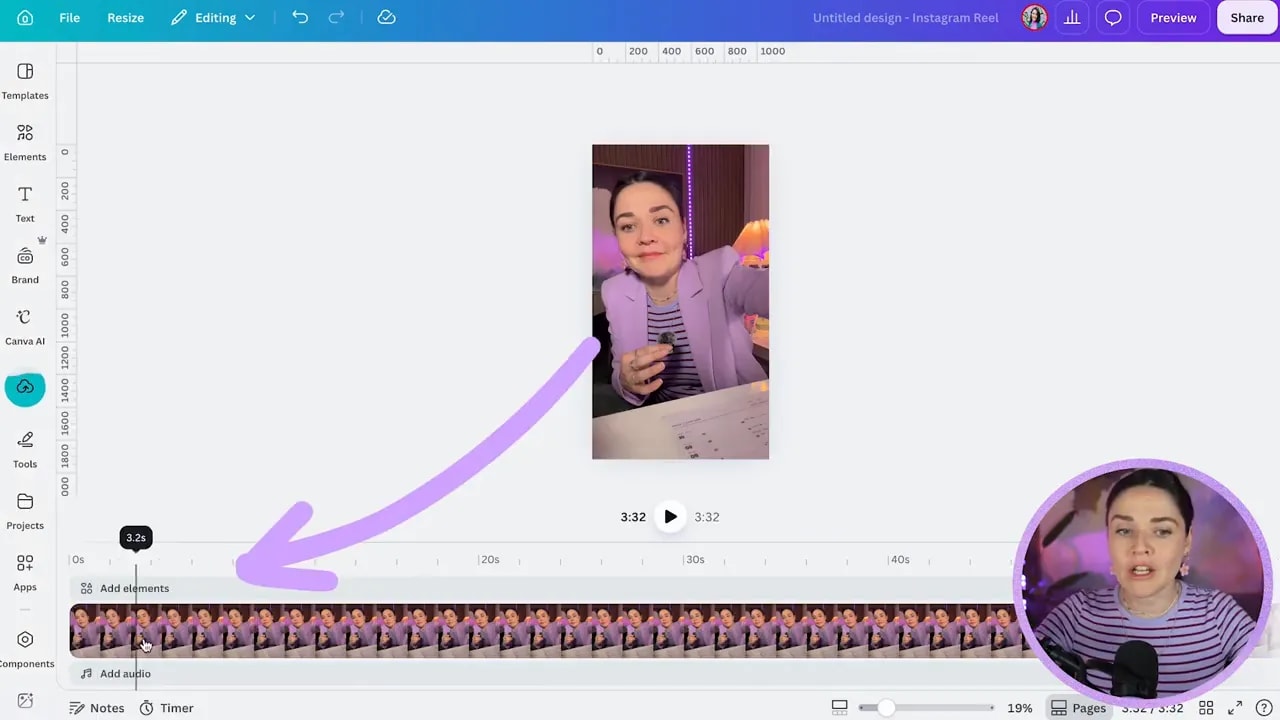
Open Uploads and upload the video you recorded. If you cannot find the file straight away, check that you are in the Videos tab rather than the Images tab.
You can click the uploaded file to place it into your design, or drag it onto the canvas. Then close or collapse the side panel so you have more room to work.
The timeline at the bottom of your screen is where the magic happens. This is where you will play through the footage, make cuts, position text, and control how long each element stays on screen.
Step 4: Trim the dead space and mistakes
The goal of a talking head reel is to feel quick and intentional. Cut the awkward moment at the start where you press record, remove long pauses, and tidy up mistakes or moments where you lose your train of thought.
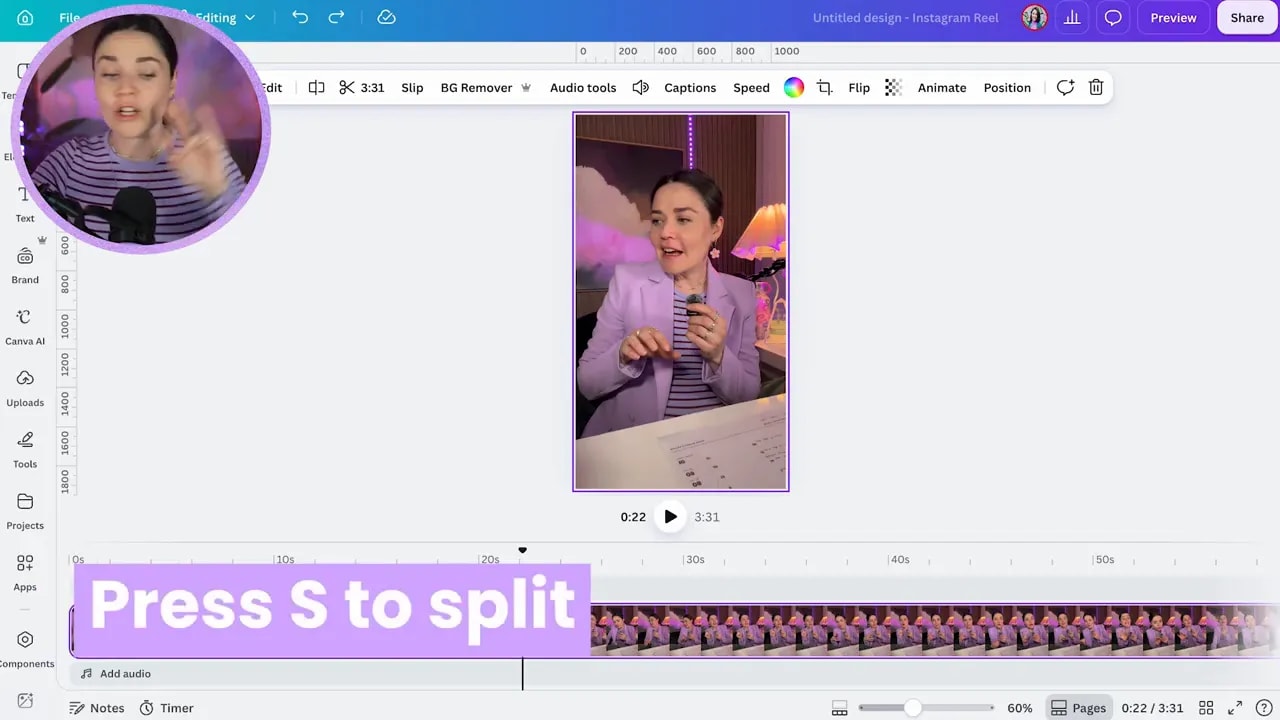
Click on the timeline where you begin speaking, then split the clip. You can use the Split button, but the fastest shortcut is simply pressing S on your keyboard while your playhead is at the cut point.
- Place the playhead where you want the cut.
- Press S to split the video.
- Select the unwanted section.
- Press Delete.
Use the space bar to play and pause as you work. If you need more precise cuts, switch the zoom control to zoom into the timeline, rather than zooming the design page. This makes it much easier to land your cuts right at the end of a word or before the next sentence begins.
Skip transitions for most talking head cuts
You do not need a transition between every cut. In fact, for about 90 percent of talking head reels, you should not add one. People are completely used to jump cuts, and the brain fills in the tiny gaps without needing a fancy swipe or animation.
Add a transition only when there is a genuine change of scenery, a new section of the reel, or an intentional creative effect. Otherwise, clean cuts keep your reel feeling faster and more natural.
Canva video editing can occasionally feel a little slow or glitchy. If playback stops behaving itself, it is usually a Canva moment, not a you moment. Click back to the beginning of the clip, press the space bar again, and allow it a moment to reload.
Step 5: Generate captions so your reel works without sound
Captions are seriously important. Many people scroll through social media with their audio off, so captions make your content easier to understand and far more accessible.
To generate them in Canva, open Text, scroll to Dynamic text, and select Captions. Choose the video sections you want to caption, select a caption animation style, and press Generate captions.
When choosing a style, focus less on the font and more on the animation. Fonts and colours are easy to update later, but the way the words appear is the part you are really choosing.
- Choose a one-word-at-a-time style for a punchy, fast-paced feel.
- Choose a few words at a time for a more balanced look.
- Choose full lines with highlighted words if you want the spoken words to be emphasised.
- Choose an underline effect if you want movement without too much visual noise.
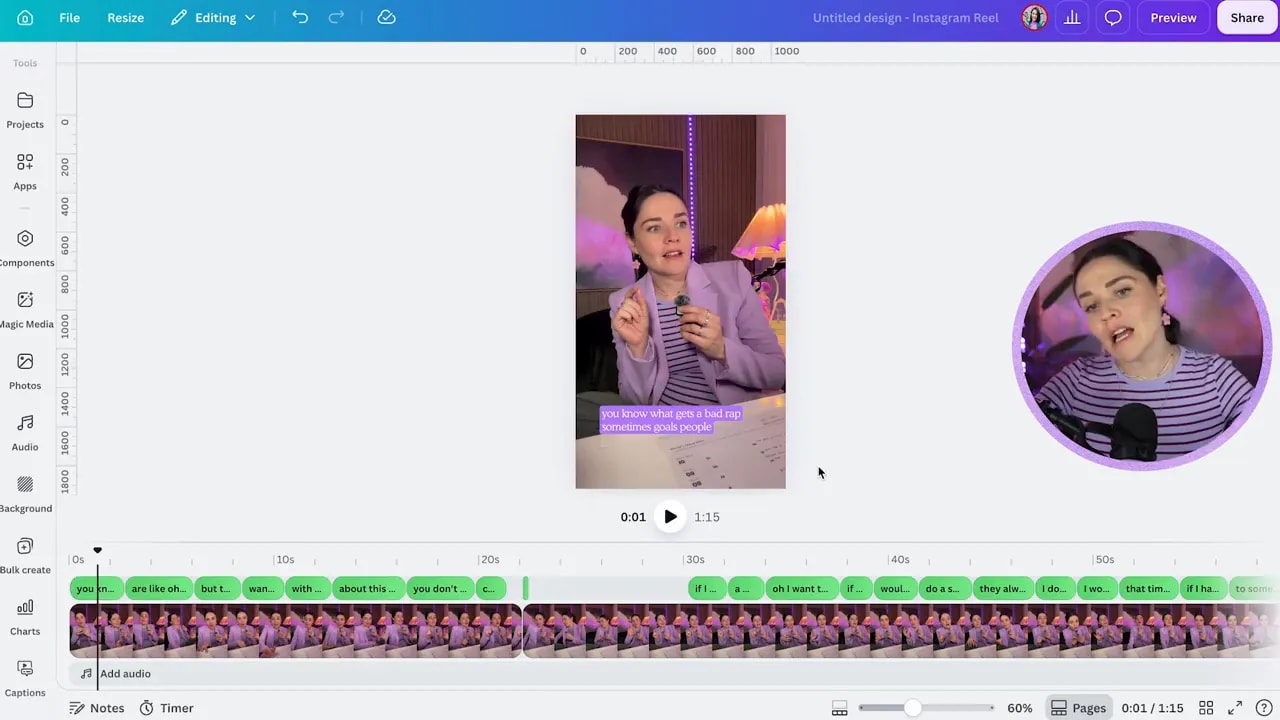
There is no single perfect caption style. The important thing is to choose one that suits your brand, is easy to read, and can be used consistently across your reels. Your caption treatment becomes part of your visual identity, so keeping it consistent also saves you from decision fatigue every time you edit.
Step 6: Position and style captions for readability
Once Canva has generated your captions, move them up from the very bottom of the screen. On Instagram, lower areas of the reel can be covered by the post description and interface elements, so text placed too low can be difficult to read.
Keep captions comfortably above the lower edge of the design. Centre them if that suits your style, and make sure there is enough contrast between the text and your background. An outline, coloured box, subtle shadow, or background effect can make a huge difference.
You can edit caption wording by selecting a caption box, opening the captions panel, and using the pencil icon to correct any misheard words, names, or typos. Auto-generated captions are helpful, but always check them.
FREE Design Tools to $100k Masterclass
Grow your biz with clever design and Canva hacks that will save you hours and make you sales.
Apply your font changes to every caption
If you want your captions in a brand font, change one caption first. Then, before clicking away, use the Change all option. Otherwise, Canva will only update that one little text box and leave the rest of the reel unchanged.
You can adjust the size, font, colour, alignment, effects, and animation like you would with normal text. Just do not go too wild. Your captions should support the message, not become so dramatic that they distract from you.
A useful editing shortcut is to generate and format captions before doing lots of cuts. When you split a video after captions have been styled, Canva is more likely to keep the formatting consistent. If you trim first and then generate captions across multiple separate clips, you may need to reposition and reformat each caption section.
Step 7: Add a clear visual hook at the start
The first few seconds matter. If someone cannot quickly tell what your reel is about, they will probably keep scrolling. A visual hook makes the topic immediately clear and gives people a reason to stay.
Go to the start of the timeline, add a text box, and write a short statement that creates curiosity around the point you are about to make. For example, you might say:
The non-negotiable thing I do to succeed
Your hook does not need to be a masterpiece. It simply needs to make the value or angle obvious.
- Keep it short enough to read quickly.
- Make it visually different from the captions.
- Use a readable size, roughly around 30 rather than tiny text.
- Place it within the safe area, not too close to the top or bottom.
- Leave it on screen for around three to four and a half seconds.
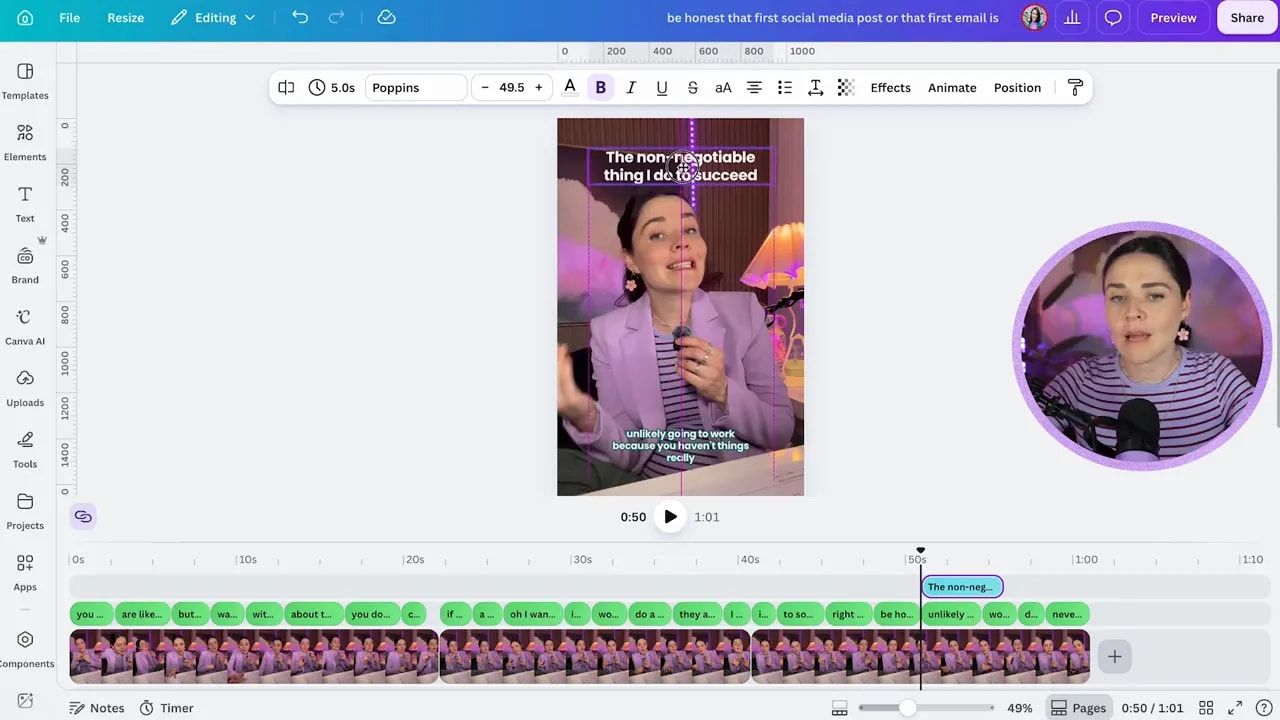
You can position the hook above your head, over yourself, or in another clear area of the screen. Just make sure it does not blend into your captions. A different background colour or text treatment will help separate the two.
If you want an additional thought or callout later in the reel, duplicate your text box using the three-dot menu or Control D, rewrite it, and drag it to the right place on the timeline.
Step 8: Use simple images and elements to reinforce your point
You can also add a small illustration, icon, or Canva element when it genuinely supports what you are saying. If you are talking about goals, for example, you might search Elements for a target or bullseye graphic.
When you add an element, it appears as its own layer in the timeline. Drag the layer to choose when it starts, then pull either side to make it last longer or shorter.
You can move the layer above or below captions as needed. This gives you loads of flexibility without needing complicated editing software. Still, be intentional. If an image is not helping your message, leave it out.
Step 9: Create a layered effect for extra production value
If you want to do something a little fancy pants, create depth by placing text or an illustration behind yourself. It looks far more advanced than it actually is.
Start by duplicating your original video. Drag the duplicate so it sits directly above the original clip and starts at the same time. Then use Canva’s Background Remover on the duplicate. Canva will cut you out from your background, creating a separate layer of you.
Now arrange the layers in this order:
- Your original video with the full background on the bottom.
- Your graphic, illustration, or text in the middle.
- Your background-removed cutout on top.
This makes the graphic look like it sits behind you. It is a lovely little detail that can catch attention and give your reel more depth with barely any extra effort.
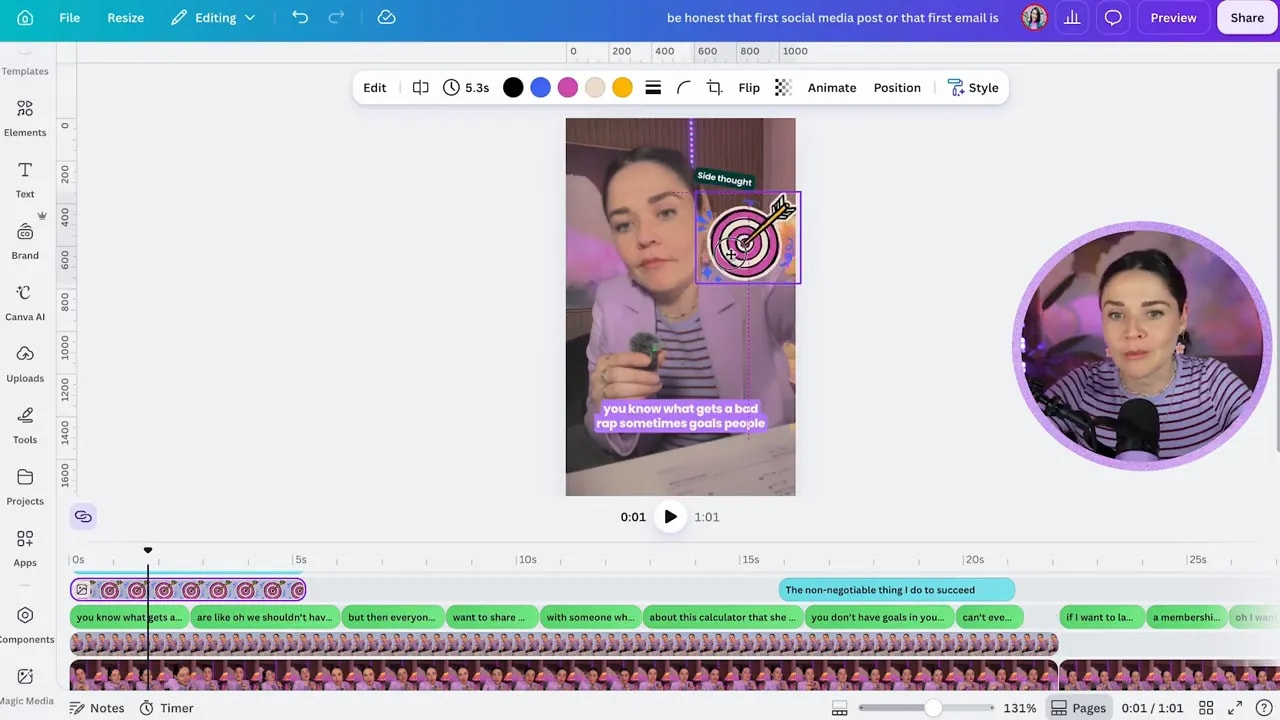
Background Remover will work best when there is clear separation between you and the background. If your background is busy or very similar in colour to your clothing, the cutout may struggle a little. You also do not need to apply the effect to a long untrimmed recording if it is only needed for a short section. Keep the effect limited to the moment where it adds something.
Step 10: Name, preview, download and post your finished Reel
When your edit is done, name the Canva file something that will make sense to you later. Use a clear title, such as Goals Talking Head Reel, rather than leaving it as an unnamed design.
Then preview your reel in Canva using the preview button or the space bar. Give it a little time to load if you have used multiple effects or layers.
You can either connect Instagram and post directly from Canva, send the finished reel to your phone, or download it as an MP4 file and post it manually. Direct posting can be handy, but downloading gives you more flexibility if you want to make final changes in the Instagram app.
Before posting, check the final version on your phone. Make sure:
- The video has not glitched during export.
- Every caption is readable and correctly spelled.
- The caption placement does not clash with Instagram’s interface.
- Your hook is clear and stays on screen long enough to read.
- Any background removal or layered effects look clean.
Step 11: Post before it feels perfect
Video editing can feel overwhelming at first, but it gets quicker every time you do it. You will learn by posting. Maybe your captions were slightly too small, the hook could have been stronger, or a colour did not work as well as you thought. That is all useful information for the next reel.
You do not need everything to be perfect before you start showing up online. Make the reel, put it out there, notice what you would improve, and create the next one.
If you want more help creating professional, trustworthy graphics and branding in Canva, you can join the free Design Tools to $100K masterclass. It covers common design mistakes, time-saving Canva shortcuts, and how a polished brand can help your business grow.