












You do not need Canva Pro to create consistently branded graphics. Canva Pro’s Brand Kit is brilliant because it keeps your colours, fonts, photos, graphics, and logos close at hand, but you can create a very similar system inside a free Canva account with a simple style guide and a few clever folders.
This workaround takes a couple more clicks than using Canva Pro, but it means you can stop hunting for hex codes, re-searching for your go-to elements, and accidentally making every design look like a generic template.
Table of Contents
- Step 1: Create a simple one-page brand style guide
- Step 2: Start with a Canva template you want to make your own
- Step 3: Copy and paste your style guide as a new page
- Step 4: Use document colours to apply your brand palette
- Step 5: Use document fonts to replace the template typefaces
- Step 6: Copy your brand elements into the template
- Step 7: Create folders for logos, elements, and photos
- Step 8: Use the Projects panel as an alternative way to add your style guide
- Step 9: Decide when Canva Pro is worth it for you
Step 1: Create a simple one-page brand style guide
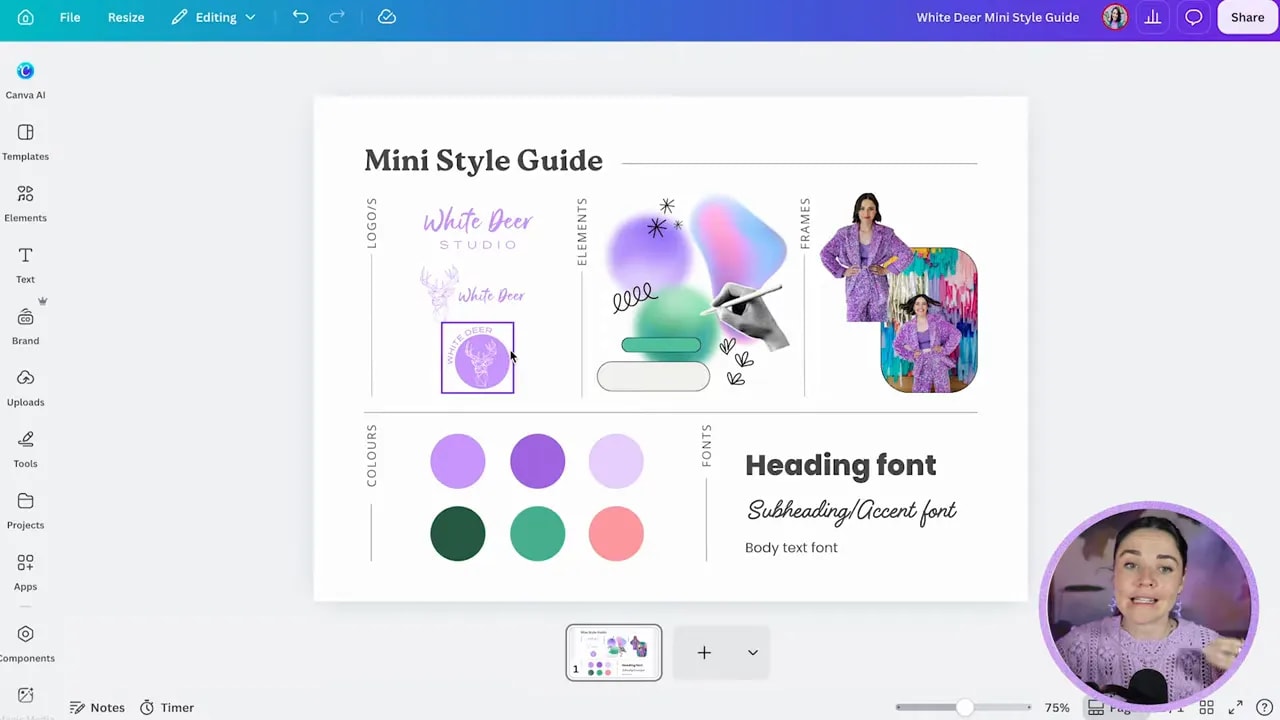
Before you build anything in Canva, get clear on what your brand actually looks like. Your style guide is the foundation of this entire workaround. It is a visual collection of the design decisions you want to repeat again and again.
Keep it all on one Canva page so it is easy to copy into any new design. At minimum, include:
- Your logos: primary logo, secondary logo, or logo variations you use often.
- Your brand colours: display each colour as a coloured circle, square, or swatch.
- Your brand fonts: add text samples using your heading and body fonts.
- Your visual elements: include any doodles, collage pieces, textures, graphics, or styling details that make your brand recognisable.
This is what allows you to take a Canva template and make it yours in seconds. Instead of using the template’s default colours, fonts, and decorative elements, you can swap in your own brand choices. The result feels unique to your business rather than like the same cookie-cutter design everyone else is using.
If you need help creating a clear, professional style guide, you can access the free Design Tools to $100k masterclass, which includes a style guide template alongside practical Canva shortcuts and design guidance.
Step 2: Start with a Canva template you want to make your own
Open Canva, create the design format you need, and choose a template as your starting point. For example, you might create an Instagram post and find a template with a layout you love, even though its red palette, typefaces, and graphics do not suit your brand at all.
That is completely fine. You are not looking for a ready-made final design. You are looking for a useful layout that you can transform with your own visual identity.
Once your template is open, you have two easy options for bringing your style guide into the same Canva document.
Step 3: Copy and paste your style guide as a new page
The first method is the one I use most often. Open your style guide in a separate Canva tab, then open the design you are working on in another tab.
In the style guide document, make sure you can see the page thumbnails. If they are not visible, select Pages in the bottom-right corner of Canva to show them.
- Select the style guide page thumbnail.
- Click the three dots on that page.
- Select Copy.
- Move back to your new design.
- Paste it with Control + V on PC or Command + V on Mac.
Your style guide will appear as a new page inside the design you are creating. Canva documents can contain many pages, and those pages can even be different sizes, so your guide does not need to match the dimensions of the social post, presentation, or document you are making.
Now your colours and fonts are sitting right there inside the file, ready to use.
Step 4: Use document colours to apply your brand palette
Once your style guide is inside the Canva document, select an item in the template and click its colour picker. Canva will create a section called Colours in this design, showing colours already used anywhere in that document.
Because your style guide includes your brand colour swatches, those colours are now available to select without manually entering hex codes. It is a beautifully simple little hack.
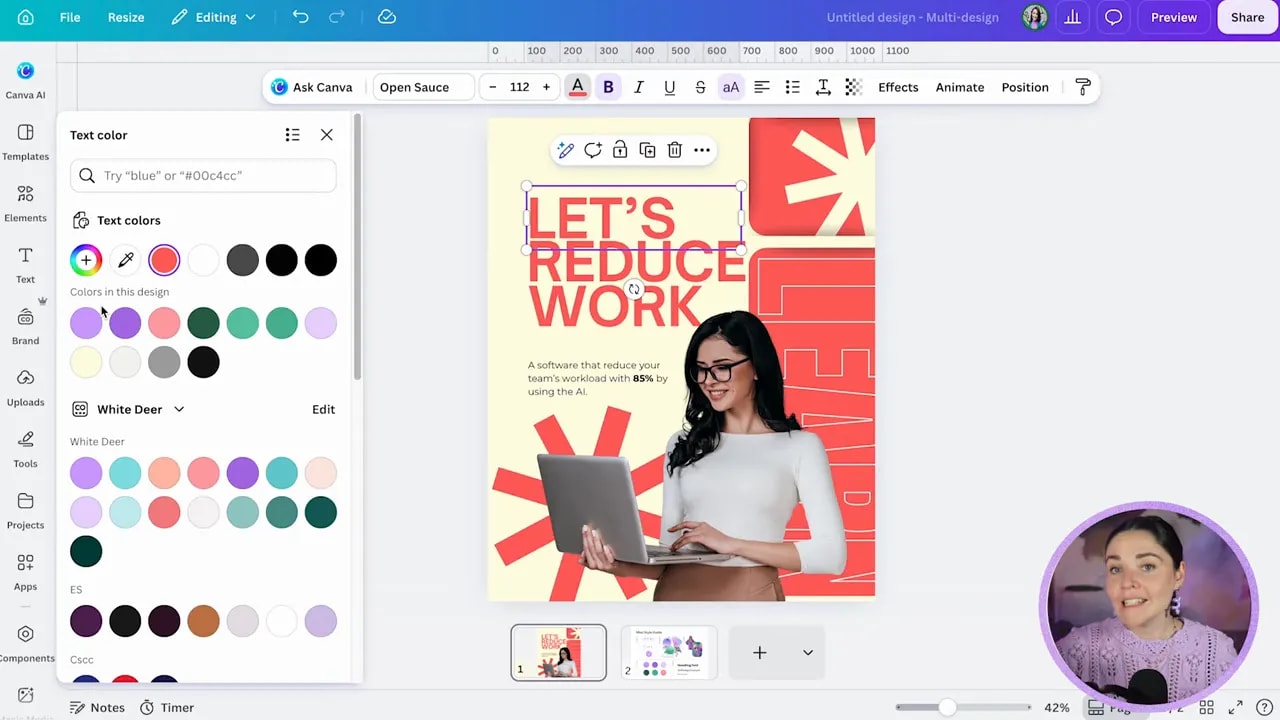
Work through your template and replace the existing colours with your own palette. If a template colour appears in several places, use Canva’s Change all option. For example, when you change a red template colour to your dark purple, Canva can update every occurrence of that red in one click.
This makes recolouring layouts much faster, especially when you are working with templates that have repeated text, shapes, backgrounds, and graphic details.
Step 5: Use document fonts to replace the template typefaces
You can use the exact same idea for fonts. Click into text in the template, open the font menu, and look for the Document fonts section.
Because your style guide page contains your brand fonts, Canva recognises those fonts as being used in the document and brings them into that list. Select your preferred font and choose the weight that suits the text, such as regular, medium, or bold.
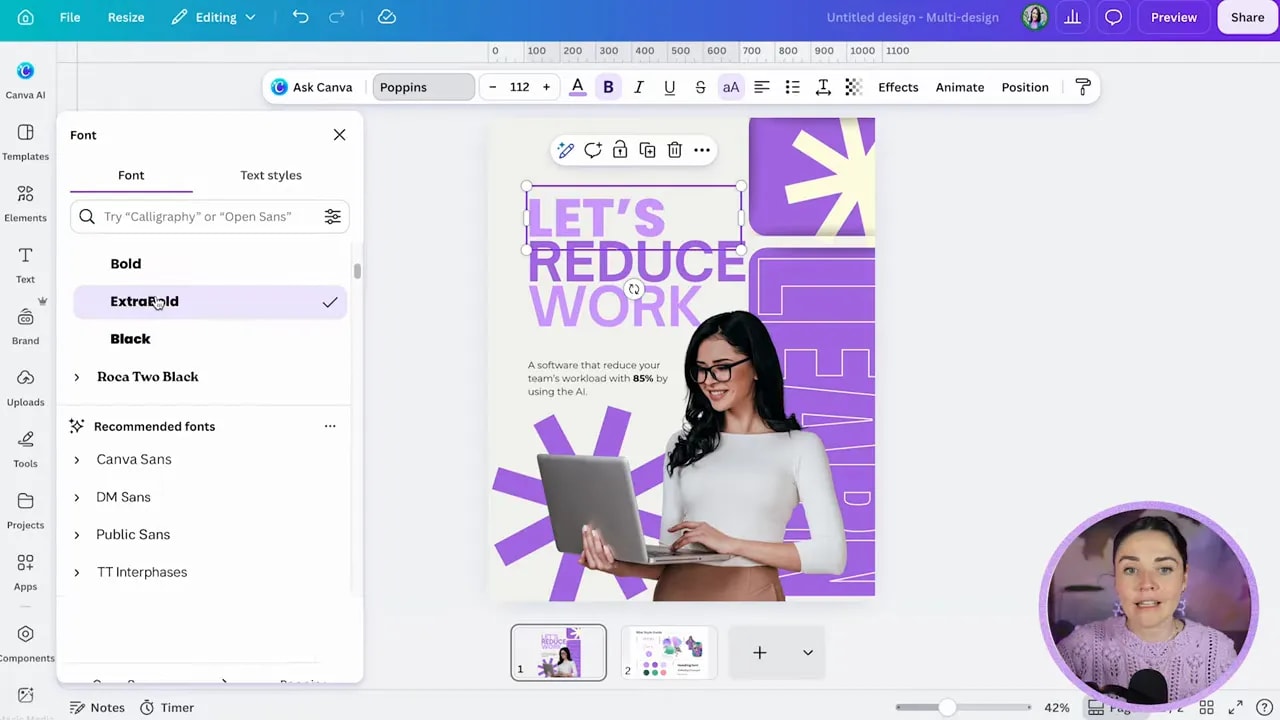
If the template has several text boxes using the same font, select Change all to replace every occurrence throughout the design. You can quickly turn a template using fonts such as Open Sans or Montserrat into one that uses your own chosen typeface, such as Poppins.
FREE Design Tools to $100k Masterclass
Grow your biz with clever design and Canva hacks that will save you hours and make you sales.
Colours and fonts do a lot of the heavy lifting, but they are not the whole story. The real personality of your brand often comes from the elements you use around them.
Step 6: Copy your brand elements into the template
Go back to your style guide page and select the brand elements you want to use. You can copy an individual item with Control + C or Command + C, then return to your design and paste it in.
This could include a gradient blob, a hand-drawn doodle, a retro collage graphic, or any other visual detail that belongs to your brand style.
At the same time, remove elements from the original template that do not match your look. Leaving in random background graphics just because they came with the layout does not help build recognisability. Replace them with the details that make your content unmistakably yours.
That is the difference between simply recolouring a Canva template and actually branding it.
Step 7: Create folders for logos, elements, and photos
Your style guide gives you quick access to colours and fonts, but folders make it much easier to access reusable brand assets. Create folders for the things you reach for regularly, such as:
- Brand logos
- Brand elements
- Collage items
- Brand photos
- Social media assets
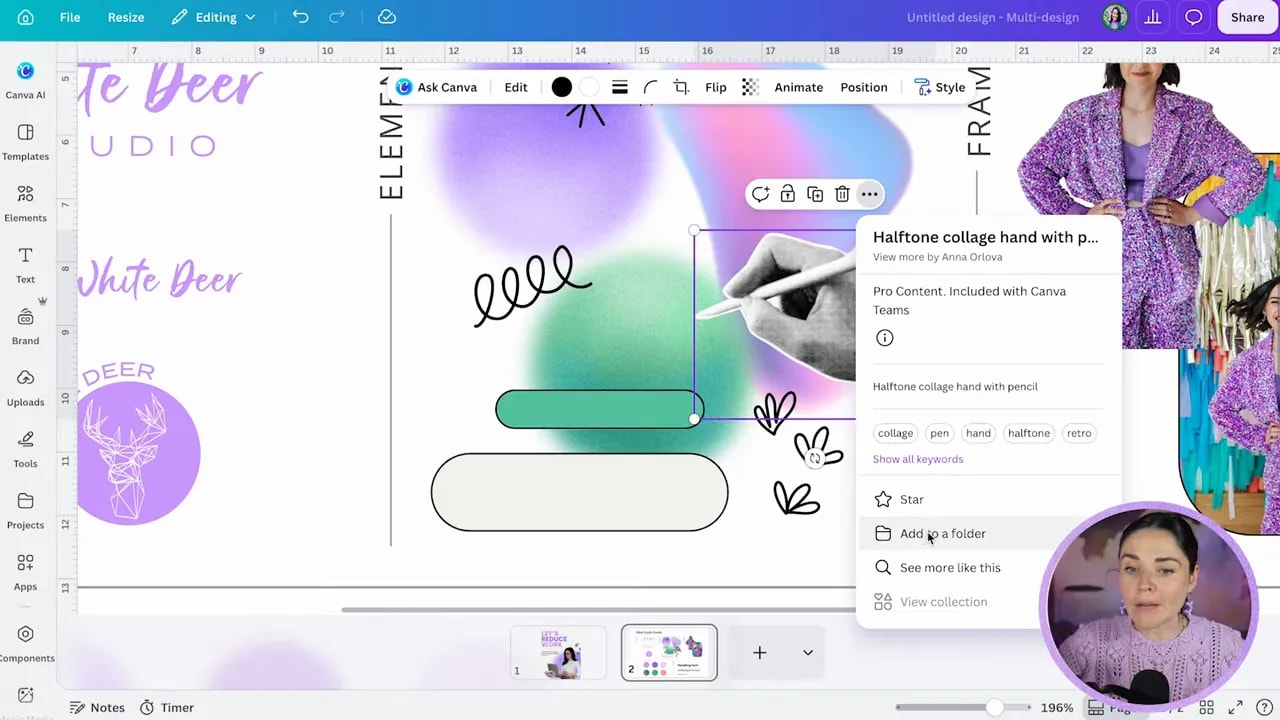
If you find a Canva library element that suits your visual style, select it, click the three dots, choose Info, then select Add to folder. You can save it to an existing folder or create a new one, such as “Brand Elements” or “Collage.”
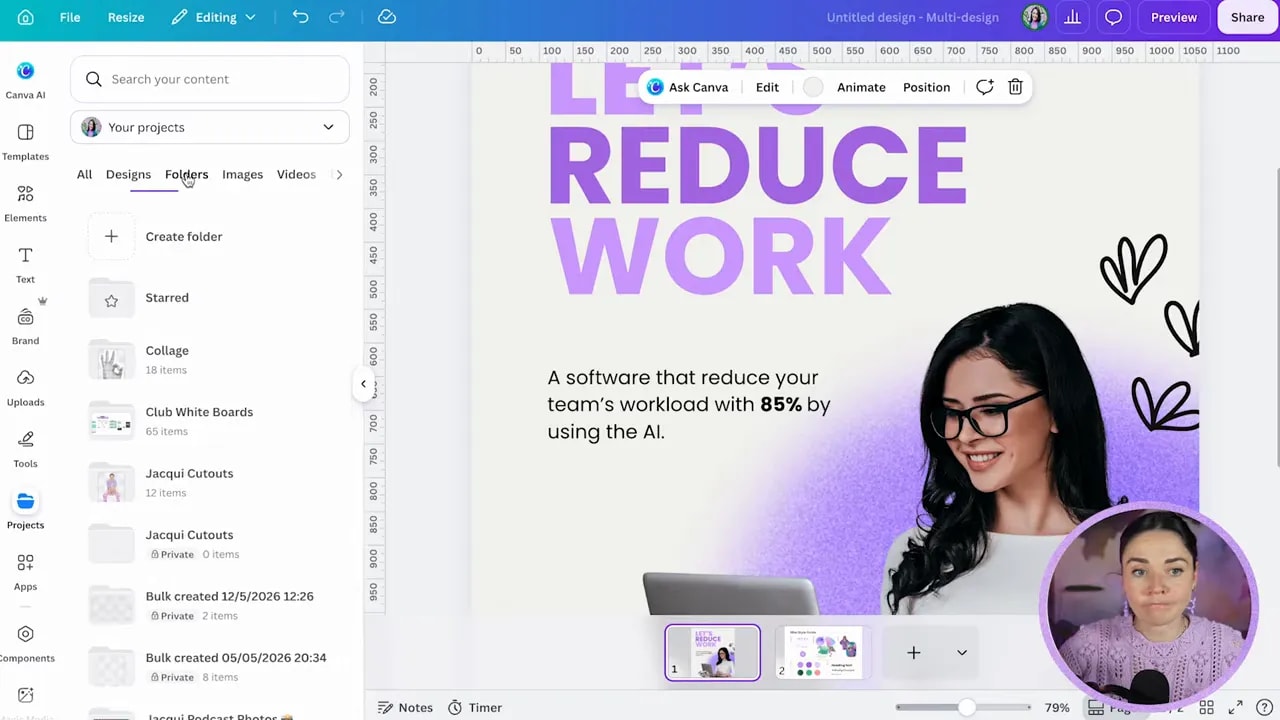
When you are working inside any design later, open Projects in the side panel, switch to Folders, and find the folder you need. You can scroll through your folders or use the search bar. Click an item and Canva inserts it directly into your design.
This saves you from repeatedly searching Canva’s library for the same graphics and hoping you find the exact one again.
Move uploaded photos and files into folders too
You can organise your own uploaded photos and graphics in the same way. In your Uploads area, click the three dots on a file and select Move. Then send it to the right folder, whether that is Brand Photos, Brand Elements, or another category that works for your business.
Over time, this becomes your own practical Canva Brand Kit system. Your style guide carries your colours and fonts into each project, while folders keep your logos, images, and favourite design elements tidy and accessible.
Step 8: Use the Projects panel as an alternative way to add your style guide
There is another way to bring your style guide into a design, and it is especially handy when you do not want to keep separate Canva tabs open.
- Open the design you are working on.
- Select Projects from Canva’s side panel.
- Search for your style guide or find it under Recent designs.
- Select the style guide and choose Add to new page.
Canva will insert your style guide directly as a new page in the document. If your current design has a different page size, Canva may resize the guide to fit. Do not worry about that. The colours and fonts are still available through the document colour and document font lists.
Step 9: Decide when Canva Pro is worth it for you
This free Canva Brand Kit workaround gives you a very similar outcome, and it is fantastic when you are new in business, working with a volunteer organisation, or simply not ready to pay for Canva Pro.
Do check whether your volunteer organisation is eligible for Canva Pro access, because some organisations can receive it. Otherwise, use this system until upgrading makes practical sense for your business.
Canva Pro becomes worthwhile when the time you spend finding workarounds starts costing more than the upgrade. If you are regularly managing brand assets, removing backgrounds, searching for free fonts, photos, and elements, or creating lots of graphics, the extra convenience can be a genuine time saver.
If you are ready to test whether it saves you enough time, you can try Canva Pro with a free trial.
Until then, keep it simple: copy your style guide into each design, use document colours and fonts, and organise your brand assets into folders. You will have a consistent, professional-looking brand system without needing to upgrade first.